Jump to content

Hi to all our members ... We  would just like to draw your attention to the latest post on the following link... Thank you for your attention .If you have already responded to my note  on Chatbox  about this please ignore this sticky note ... Thanks  folks ....

http://www.tipf.co.uk/forums/topic/46369-important~-the-forum-its-future-and-finances/

Clicker and Ryewolf   ADMIN TEAM 

Regretfully we have to once again ask members for  some financial support in order to  keep TIPF  running till December 2023. The more pledges we have to become  FRIEND OF THE FORUM  the less the individual cost will be so  if you want this Forum to continue  please follow the link below  and decide  if you are able to  support us . Thank you all for your support in the past ... it has been appreciated  a great deal ...

https://www.tipf.co.uk/forums/topic/57184-202223-forum-finances-update-important-notice/

 Clicker and Ryewolf  ...  Admin Team 

Hi TIPFers 

I AM HERE AGAIN WITH THE  BEGGING BOWL TO ENSURE THE FORUM CAN KEEP GOING ... Please follow  below if you want to  support the continuation  of this Forum and  this  small but friendly community. 

As always your support is  both vital and appreciated ...

 Clicker and Ryewolf ...

https://www.tipf.co.uk/forums/topic/57184-202223-forum-finances-update-4th-july-2023/


lighting question: taking photos of old photos


Recommended Posts

Hi, everyone. Seeking tips and advice about lighting for a photography project at home.

My husband and I are creating a sort of family history archive. We are looking to create high-quality digital photographs of all the old family photos and documents that have been passed down.

So we're taking photos of photos. As a photography newb, the first hurdle I'm facing is getting a sensible lighting situation. Right now it's just natural light from the windows combined with our home's normal overhead lights, occasionally supplemented by a little side lamp. This results in a frustrating combo of glare, shadow, and even a mirror-like reflection on the face of the photo being photographed.

I've thought of maybe laying the subject photo in the bottom of a box with high sides, to cut out the side light, then lighting the inside of the box by some means in a way that doesn't cause glare but bright enough to get a really good photo. What kind of light or lamp would you suggest? Or is a box idea just the sort of cute idea a non-photographer would come up with, when there is a simpler, better solution? :)

Your advice welcome!

We have considered scanning the photos instead, which would address the lighting issues, but I find that scanning is not a clean enough image (always seems to have dust specks and lint in the image), and some of the portraits are just too big for a scanner.

Link to comment

A method to take photos of photos 

You will need a tripod that can be reversed this means you can place the photo flat under the tripod and you are then able too wind your camera up or down (nearer or away from the photo) between the legs 

you will need at least one flash off camera 2 is better 
you will need some means of triggering the flash/s amazon e bay etc do cheap chinese transmitters and receivers (one transmitter from flash shoe on camera and 2 receivers 1 per flash 

You can then experiment with the flashes to eliminate glare or shadows 

Sounds expensive but you dont need an expensive tripod as the weight is between the legs making it quite sturdy 
Transmitters and receivers  Neewer do them on amazon for £16 for 1 tran and 2 receivers 

Flashguns, check out charity shops for old flashguns Provided you dont use them on your hot shoe and only on the receivers you will be okay 
Old flashguns use higher trigger voltage than new guns (blame the EU for limiting trigger voltage to 6v ) some old guns go up to 220v and can fry the camera electronics 

There you go a stick to hang your guns with gaffer tape and experiment away 

Of course you could be stinking rich in which case, for a fortune, there are things you can buy 

  • Like 2
Link to comment

Or a second alternative using a copy stand, which is designed to keep the image parallel to the base and a couple of diffused contionous lighting at 45deg each side using 5500kelvin daylight bulbs and a camera remote trigger.

This link might give you an idea of a setup...

http://www.dpbestflow.org/camera/camera-scanning#print

  • Thanks 1
Link to comment

I  have  been archiving photos and documents for my family history  for 25 years and invested in  a really good quality flatbed scanner and scanned  photos in a really high resolution  and then edited them in Photoshop ...Currently the Epson Perfection V550  has good reviews. I have only photographed  photos for Family History Archives  when they have been too delicate and fragile to remove from a picture frame to place on the flatbed scanner . 

Link to comment

If you wish to be very frugal as far as the lighting is concerned, I have had great success, using the Northern light in my tiny conservatory/studio, I have a large white canvas roller blind to diffuse the light perfectly so no shadows.....a very simple card reflector might help on some days.

The biggest problem is getting the final shot, right ...in-frame, all edges square to camera....so a tripod set up is best, once set you can re-photograph every old pic very quickly.

I use one of my best Vintage lenses, the ROKKOR f4-1.8 on my micro-four-thirds Camera.

Below is a 1948 pic rephotographed that way....plus....one of my large collection of Edwardian glass-plate negatives, made positive using a cheap eBay lightbox

Then converted into positive using Photoshop CS6.

Hope this helps

FUJI

4B4EA468-87C0-4CB1-82EF-30AA2C4FDA70.png

31D020AB-F2C0-4CB8-8D7A-4B3B26FF2BEF.jpeg

Edited by FUJI
  • Like 1
Link to comment

I'm going to go with recommending a scanner and not a camera. You get a far higher resolution, it will be far sharper, you don't have lighting issues, you don't have alignment issues, white balance issues or the possibility of uneven lighting.

Yes - for the odd large image pin it to a wall and use two diffused lights at equal distances pointing 45° towards the subject to stop glare.

  • Like 1
Link to comment

Especially appreciated the link, example photos, and specific equipment or product recommendations in the responses above.

About scanning...  may I ask more questions of those who have used this method of digitalising old family treasures? Our goal is to produce a clear and clean reproduction, that will allow for 1. easy sharing 2. printing for display and 3. preservation, in case of loss of the original. Can anyone with experience of scanning old photos share a review of how well it worked to print out images for display?

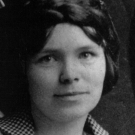
We have a flatbed scanner, which is fine for documents. But when we have tried to scan photos on it, the result is dreadful. The photos are "spotty". I assume this is some kind of dust or lint problem? Also, I've got some rather delicate photos which are coming up on 100 years old... will the harsh light from the scanning process damage them? I've included one such photo, that of my grandmother. This is just a snapshot taken on my phone. You may be able to see how beat up the photo is... it's really starting to crack and perish. My grandma has about 60 descendants at last count... I really feel a responsibility to produce a good quality copy that is available for27783015_2453769041515347_561873704_n.jpg.518db6b48bb1de67920920487086cbd5.jpg the wider family to print, before the original gives up the ghost.

Any insights gratefully received, thanks! :)

Link to comment

I have an evening appointment  but I will come back to you on this ...as I said earlier  (and BP seems to agree )in my opinion  a good dedicated flatbed scanner with the option to scan at various resolutions would be the best option..  I’ll catch you later ... 

  • Thanks 1
Link to comment

I've used a flatbed scanner to scan photographs, though not as old and delicate as the one you mentioned, at 300 & 1200dpi - though never printed them out. I've also photographed using my camera, under studio lights and just using daylight. I did read somewhere that the harsh light from the scanner could damage the photographs, so maybe not so good for the old and delicate ones, in which case you could photograph them. If you're photographing them the quality of lens also comes into play.

Link to comment

This is just my opinion based on 20 years of  doing  photo restoration work  both on my own family photographs  and those of other people who had treasured  but often faded and damaged  photographs of their  relatives and ancestors.

On the subject of light damaging  the photograph from a scanner, Yes all light damages but in my opinion it is a slow process and  cumulative .... the light from a single scan is less likely in my opinion to damage a photo than numerous high powered  flash lights. 

 Two things will become apparent if you intend to do this ... the first is that  you will need to have a fair amount of storage space on your computer because some files will be a great deal  larger that  the  small jpegs that are usually associated with photographs that  people upload to the  net . .You can save them  to flash drives or the cloud or external drives  as back up and I would suggest that each original scan is saved as a Tiff format file  which you keep as a master copy. This is . because  jpg format is a lossy one and this means that  it loses a few pixels every time it is saved ....eventually becoming pixelated and degraded in quality..Once you have the master copy scan just name it  but  never use it.... it is your master copy of the original . Always  duplicate it  to work on and save the final edit as a jpeg. if you want

The second thing to establish ( apart from investing in a good scanner ) .is  whether  you intend to use any editing programmes such as Photoshop to  restore and repair digitally any of the pictures that you have. Some may only require an adjustment in the contrast  if they are  faded  etc  some may  ot greyscale require repair work  to remove stains  or creases. Some  may require extensive restoration. This takes skill and patience ...all of which can be  learned .

ALWAYS SCAN IN COLOUR ...EVEN SEPIA  AND BLACK AND WHITE  PHOTOS ....IT RETRIEVES MORE TONES THAN GREYSCALE
 

The following link is an up to date  version of my   bible  when it comes to scanning photos ... I hope it helps
https://thephotorestorationcenter.com/the-top-10-tips-for-scanning-photos/


  • Like 2
Link to comment

Join the conversation

You can post now and register later. If you have an account, sign in now to post with your account.

Guest
Reply to this topic...

×   Pasted as rich text.   Paste as plain text instead

  Only 75 emoji are allowed.

×   Your link has been automatically embedded.   Display as a link instead

×   Your previous content has been restored.   Clear editor

×   You cannot paste images directly. Upload or insert images from URL.

×
×
  • Create New...