Creativesnaps
-
Posts
239 -
Joined
-
Last visited
-
Days Won
4
Content Type
Profiles
Forums
Events
Members' Showcase
Everything posted by Creativesnaps
-
Well done Korky. A worthy POTW. I like the use of the texture, I think it adds to the mood of the image. Thanks you Heather for the mention
-
Never really thought like that but now i will. I be a bit more careful from now one with what i post.
-
Hi Paul. Just joined myself. Its a cracking place.
-
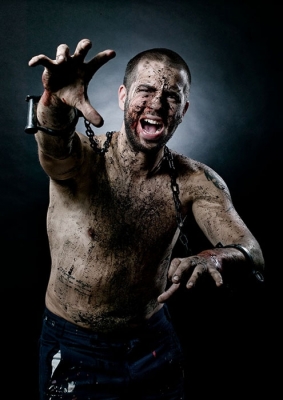
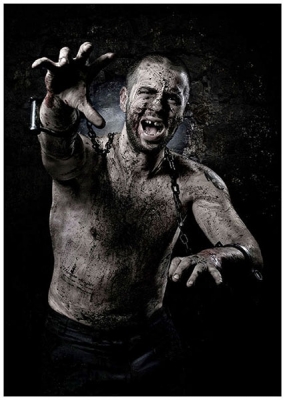
Here is a before and after with the above used. Its not my best edit as its one of my early ones.

-
Thanks for your welcomes . It certainly is a friendly place :)
-
Well done with this.
-
Well done on POTW.
-
Very useful. I'll be saving them for my lads and anyone else I know who wants to get into photography. Very well set out. Thank you for the share.
-
That's amazing.
-
Lol. Say no more. Totally agree.
-
I used to take shots for the heck of it when I turned to the digital side but now I plan the shots (unless its snap shots of my family) and yeah I get the blinks and so on which get binned but with what style of togging I do, it's all down to planning. I have my mind set as if I was using film and then using PS to create the rest of (if I can't do it in camera) what I envisioned.
-
I know i am new here but the thing this place has in its favour is that it's very friendly and people comment and get involved. It's the most friendly forum I have been on and I actually thought at first that something's not right here I have been on some sites where they are actually nasty/clicky at time and just damn right rude. It's all down to the members as Phil said, to keep the forums going. Sorry to here of IP not doing well Bill as I know you were an active member.
-
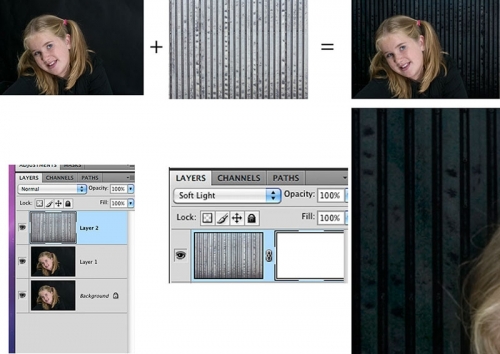
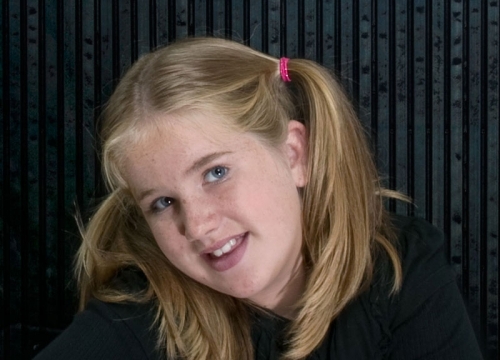
A quick and easy mask to keep even the smallest hair when superimposing a textured background. IT ONLY WORKS ON DARK BACKGROUNDS LIKE GREY AND BLACK. 1. Open your image and duplicate it. (i always duplicate even though i may not have to at times.) 2. Open your texture image and drag it to the image you are editing. 3. Set the layer of the texture to softlight. 4. Add a mask to the texture layer. 5. Select a soft brush. 6. Paint on the mask of the texture layer with black and paint out the texture from the subject. You will then have to do level,curve and sometime colour adjustments to the texture layer ONLY (i won't go into that though as i am getting off track) to make it fit the image better. I haven't done it with this as i want the mask to stand out better. Its as easy as that. Layer options are your friend if you know how to use them. Hope you like it and saves you time in the future with having to do complicated masks. Here is a B&A i did a while back using the above.
- 1 reply
-
- 1
-

-

Proofing & printing your images
Creativesnaps replied to Creativesnaps's topic in Photoshop Tutorials
Your both welcome. I'll add some more tutorials if you like when i get some time this week. -
I thought i would share some info i have learnt over time on printing and proofing in PS. The key to having a good print is to proof them in photoshop, as printers (some set down more ink than others), ink and paper/paper type (different paper, matt for Instant absorb more ink and resin type absorb less) all vary from brand to brand. A calibrated screen is just a viewing aid and gives or helps to achieve true colour on screen it has nothing to do with the printing of an image except aiding you in getting accurate colour on screen, its all down to proofing the image. To proof the image for PRINTING- 1. Duplicate the image you are going to print. 2. Goto - view, proof setup then custom 3. In the Device to simulate option choose say for the epson SPR1800PGPP (PGPP Premium Gloss Photo Paper). These settings in the device to simulate option will changed depending on what printer you use. 4. Check simulate paper colour. 5. hit OK. 6. Compare the proofed image with the original (or press command/control Y to flick the proof setup on & off) and alter the saturation, brightness or what ever else is needed to match the proofed version to that of the original version. Thats It. If you want to be more accurate to match the one on the screen then what i do is make 6 small images (A selected areas of the image) in photoshop on there own layers and for each layer i name the adjustment i have just made for that layer, like a curves adjustment. You then print it on an A4 or bigger and compare the 6 images on the A4 to see which is a good match (repeat if you need to if they are still out). You then apply the correct adjustment to the image you are going to finally print. Proofing is also good if you want to see how your image will look on a PC monitor if you are a mac user. I use this a lot when uploading to the web as the majority of people use PC's. This is helpful when using Photoshop to print. When printing using photoshop. 1. Select print. 2. Under the colour handling select photoshop manages colour. 3. under the printer profile option select the paper type say SPR1800PGPP 4. check black point compensation. 5. hit print. 6. then you get to the printers setting. 7. You will see a box that says layout, press it and select colour management and check OFF, no colour management. This stops the printer managing the colour and Is an important step. 8. Then goto print settings (under the same drop down box you have just used) and select the type of paper, say PGPP and select colour or B&W for mono. Hit print and see what you have. Hope this will be of use to someone
-
Hi Colin. LOL yeah that's true . It's Jonni
-
Many thanks for all your welcomes
-
Hi all, hope I can contribute in some way.